When you're writing end-to-end tests, authentication can often become the first gatekeeper. You can't test the actual functionality of your app without first getting past the login screen. But modern authentication methods can make automation difficult, utilizing multiple factors that are difficult to automate (which is actually the point of 2FA).
This is usually handled either by skipping these methods on test environments or some other workarounds. Some might argue this is not true e2e testing. To be honest, it’s probably a debate for another day, but there is definitely a merit to critiquing the approach of bypassing login.
So how to handle authentication properly?
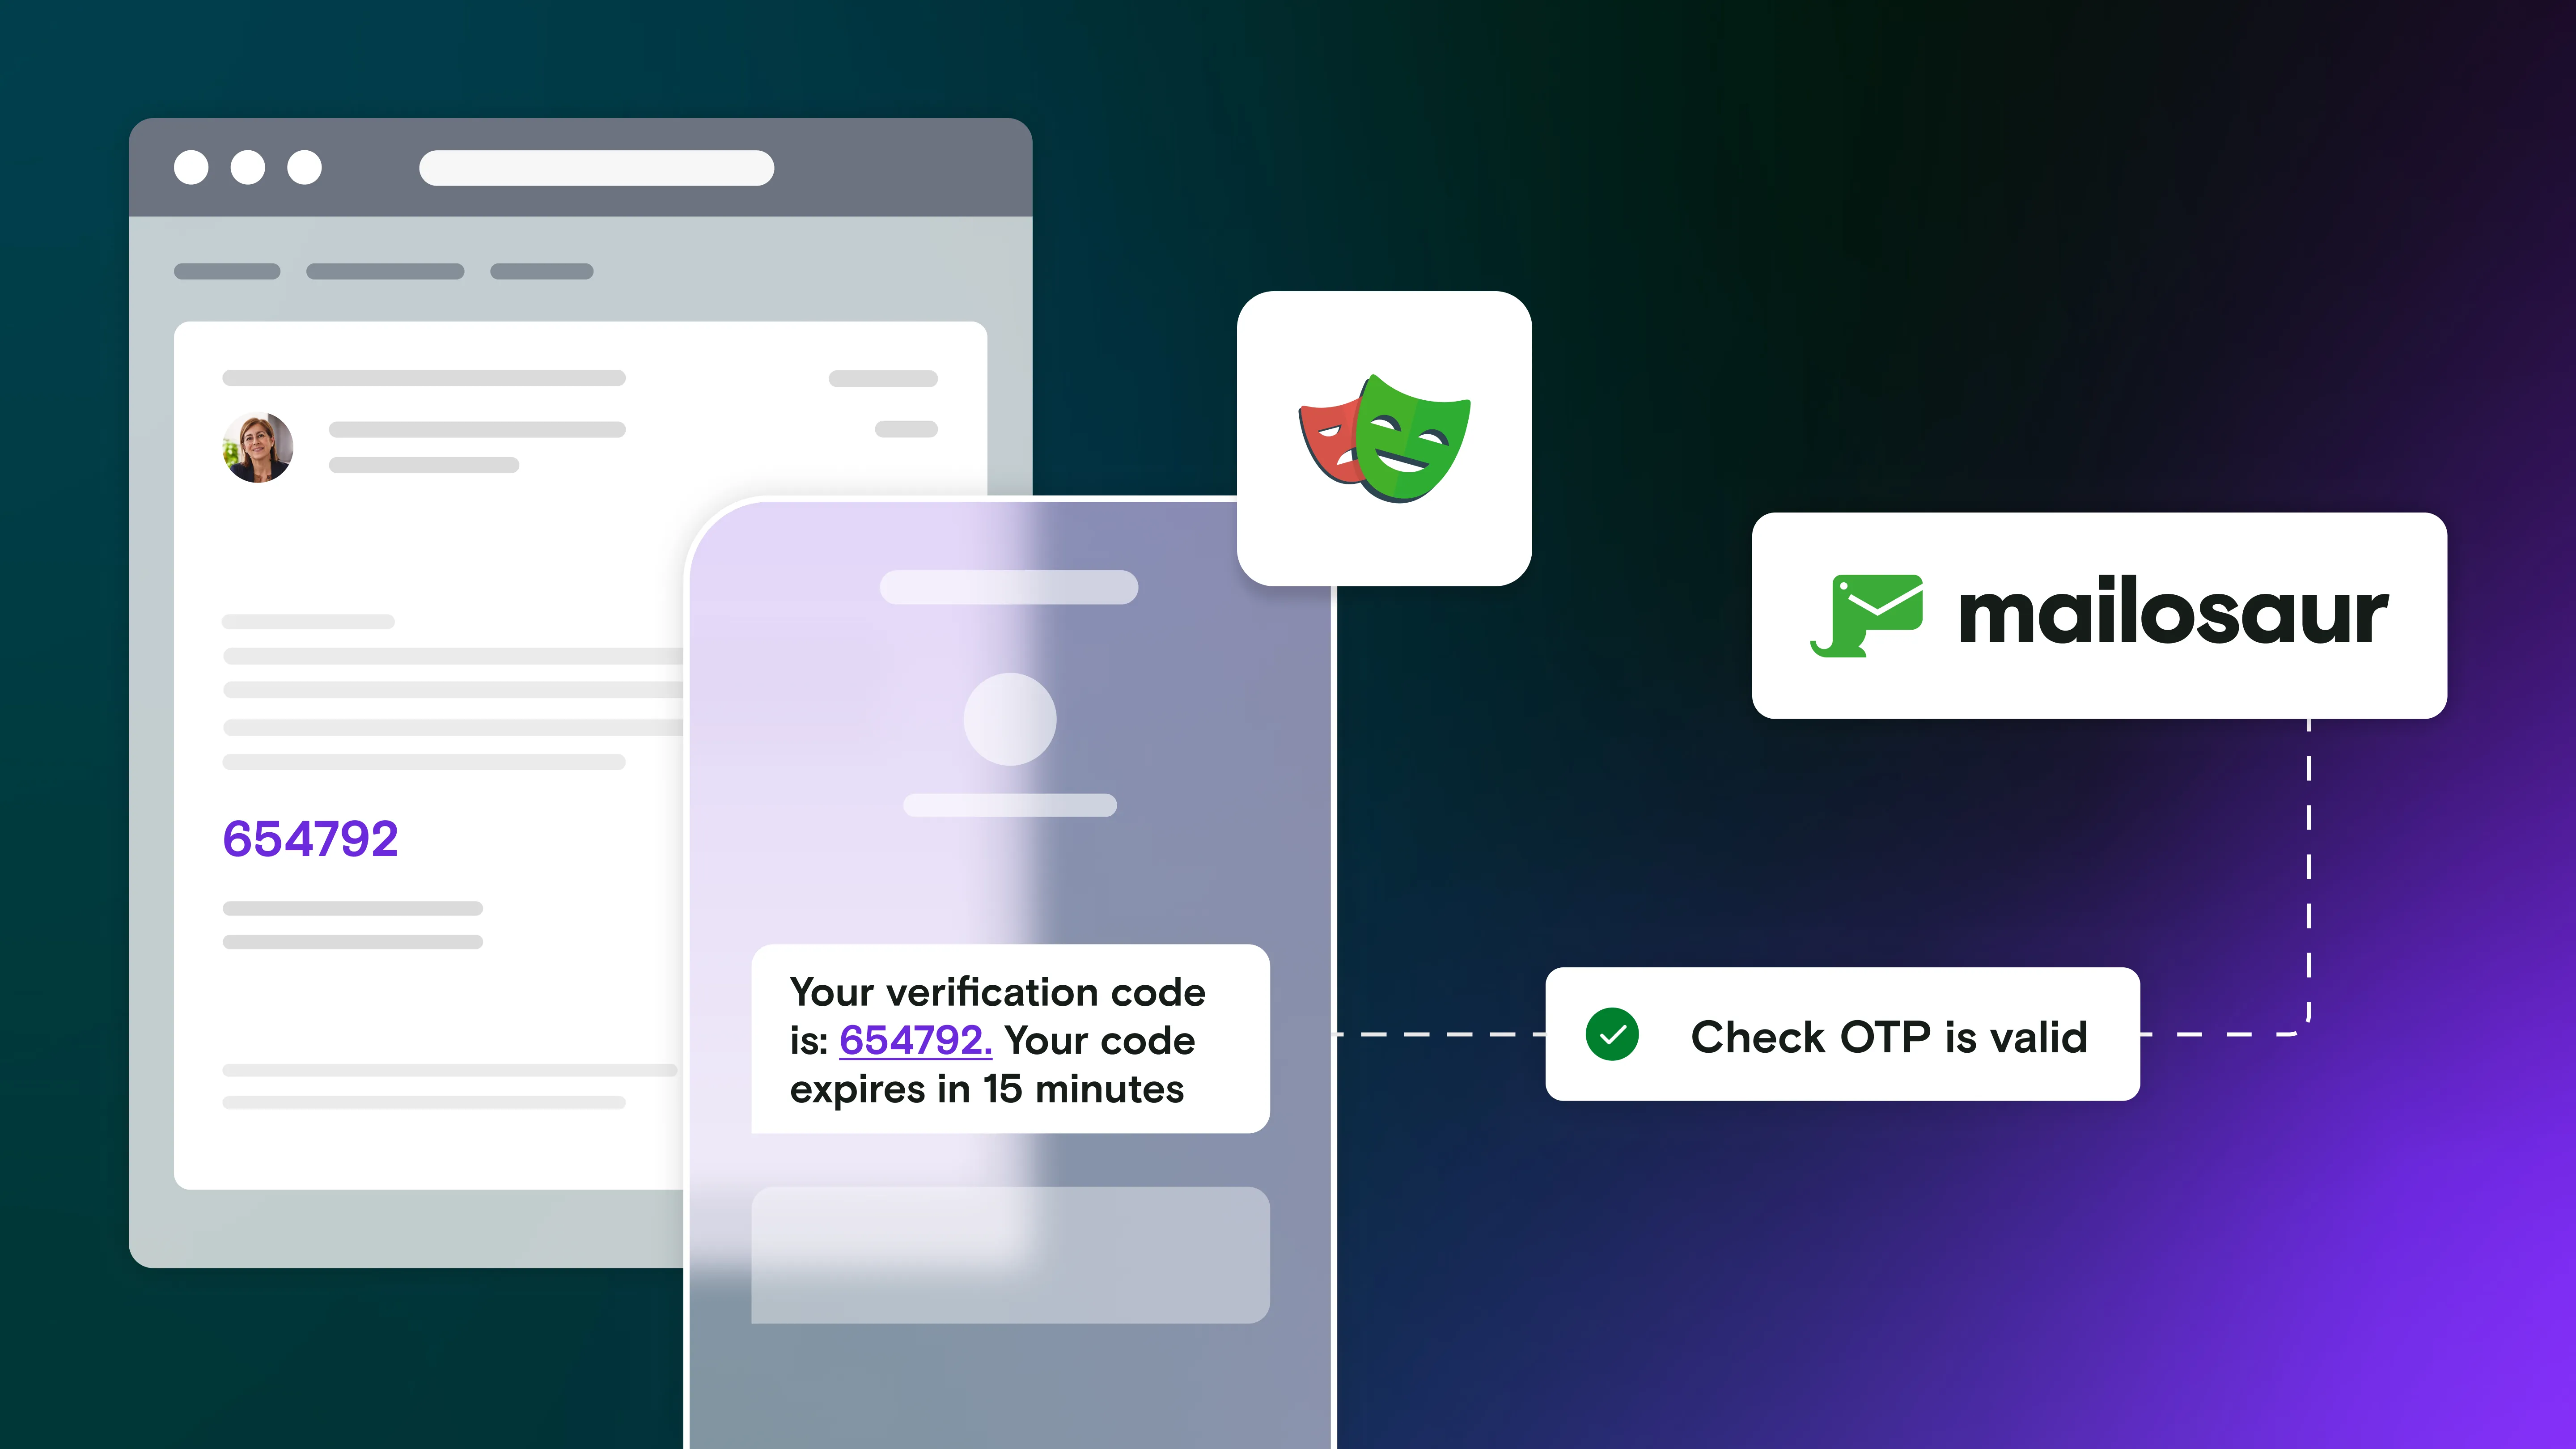
For years now, my go-to solution has been Mailosaur. It is a testing service that gives you virtual email addresses and phone numbers for automation. Think of it as a testing inbox that your tests can programmatically access. You can:
- Send emails to unique addresses and retrieve them via API
- Receive SMS messages to virtual phone numbers
- Generate authenticator app codes without a physical device
Let me show you how to set it up.
Getting started
First, you'll need a Mailosaur account. This is needed to create virtual email addresses and phone numbers for your tests. Once you have one, install the Mailosaur client:
npm install --save-dev mailosaurIn your Mailosaur account, you'll need two things:
- API Key: Found in your account settings
- Server ID: A unique identifier for your testing inbox
It’s good to keep these private (especially the API key), so I recommend storing these in environment variables, either in .env file or in your CI/CD pipeline.
# .env
MAILOSAUR_API_KEY=your_api_key_here
MAILOSAUR_SERVER_ID=your_server_id_here
Now let's tackle each authentication method.
Method 1: Email magic links
Magic links are becoming increasingly popular. They can be used instead of a password, but in essence they are the same thing you use when you reset your password. A link that authorizes certain usage (logging in or changing your password) is generated on server and sent to the account owner’s email. Here's how the flow looks like:
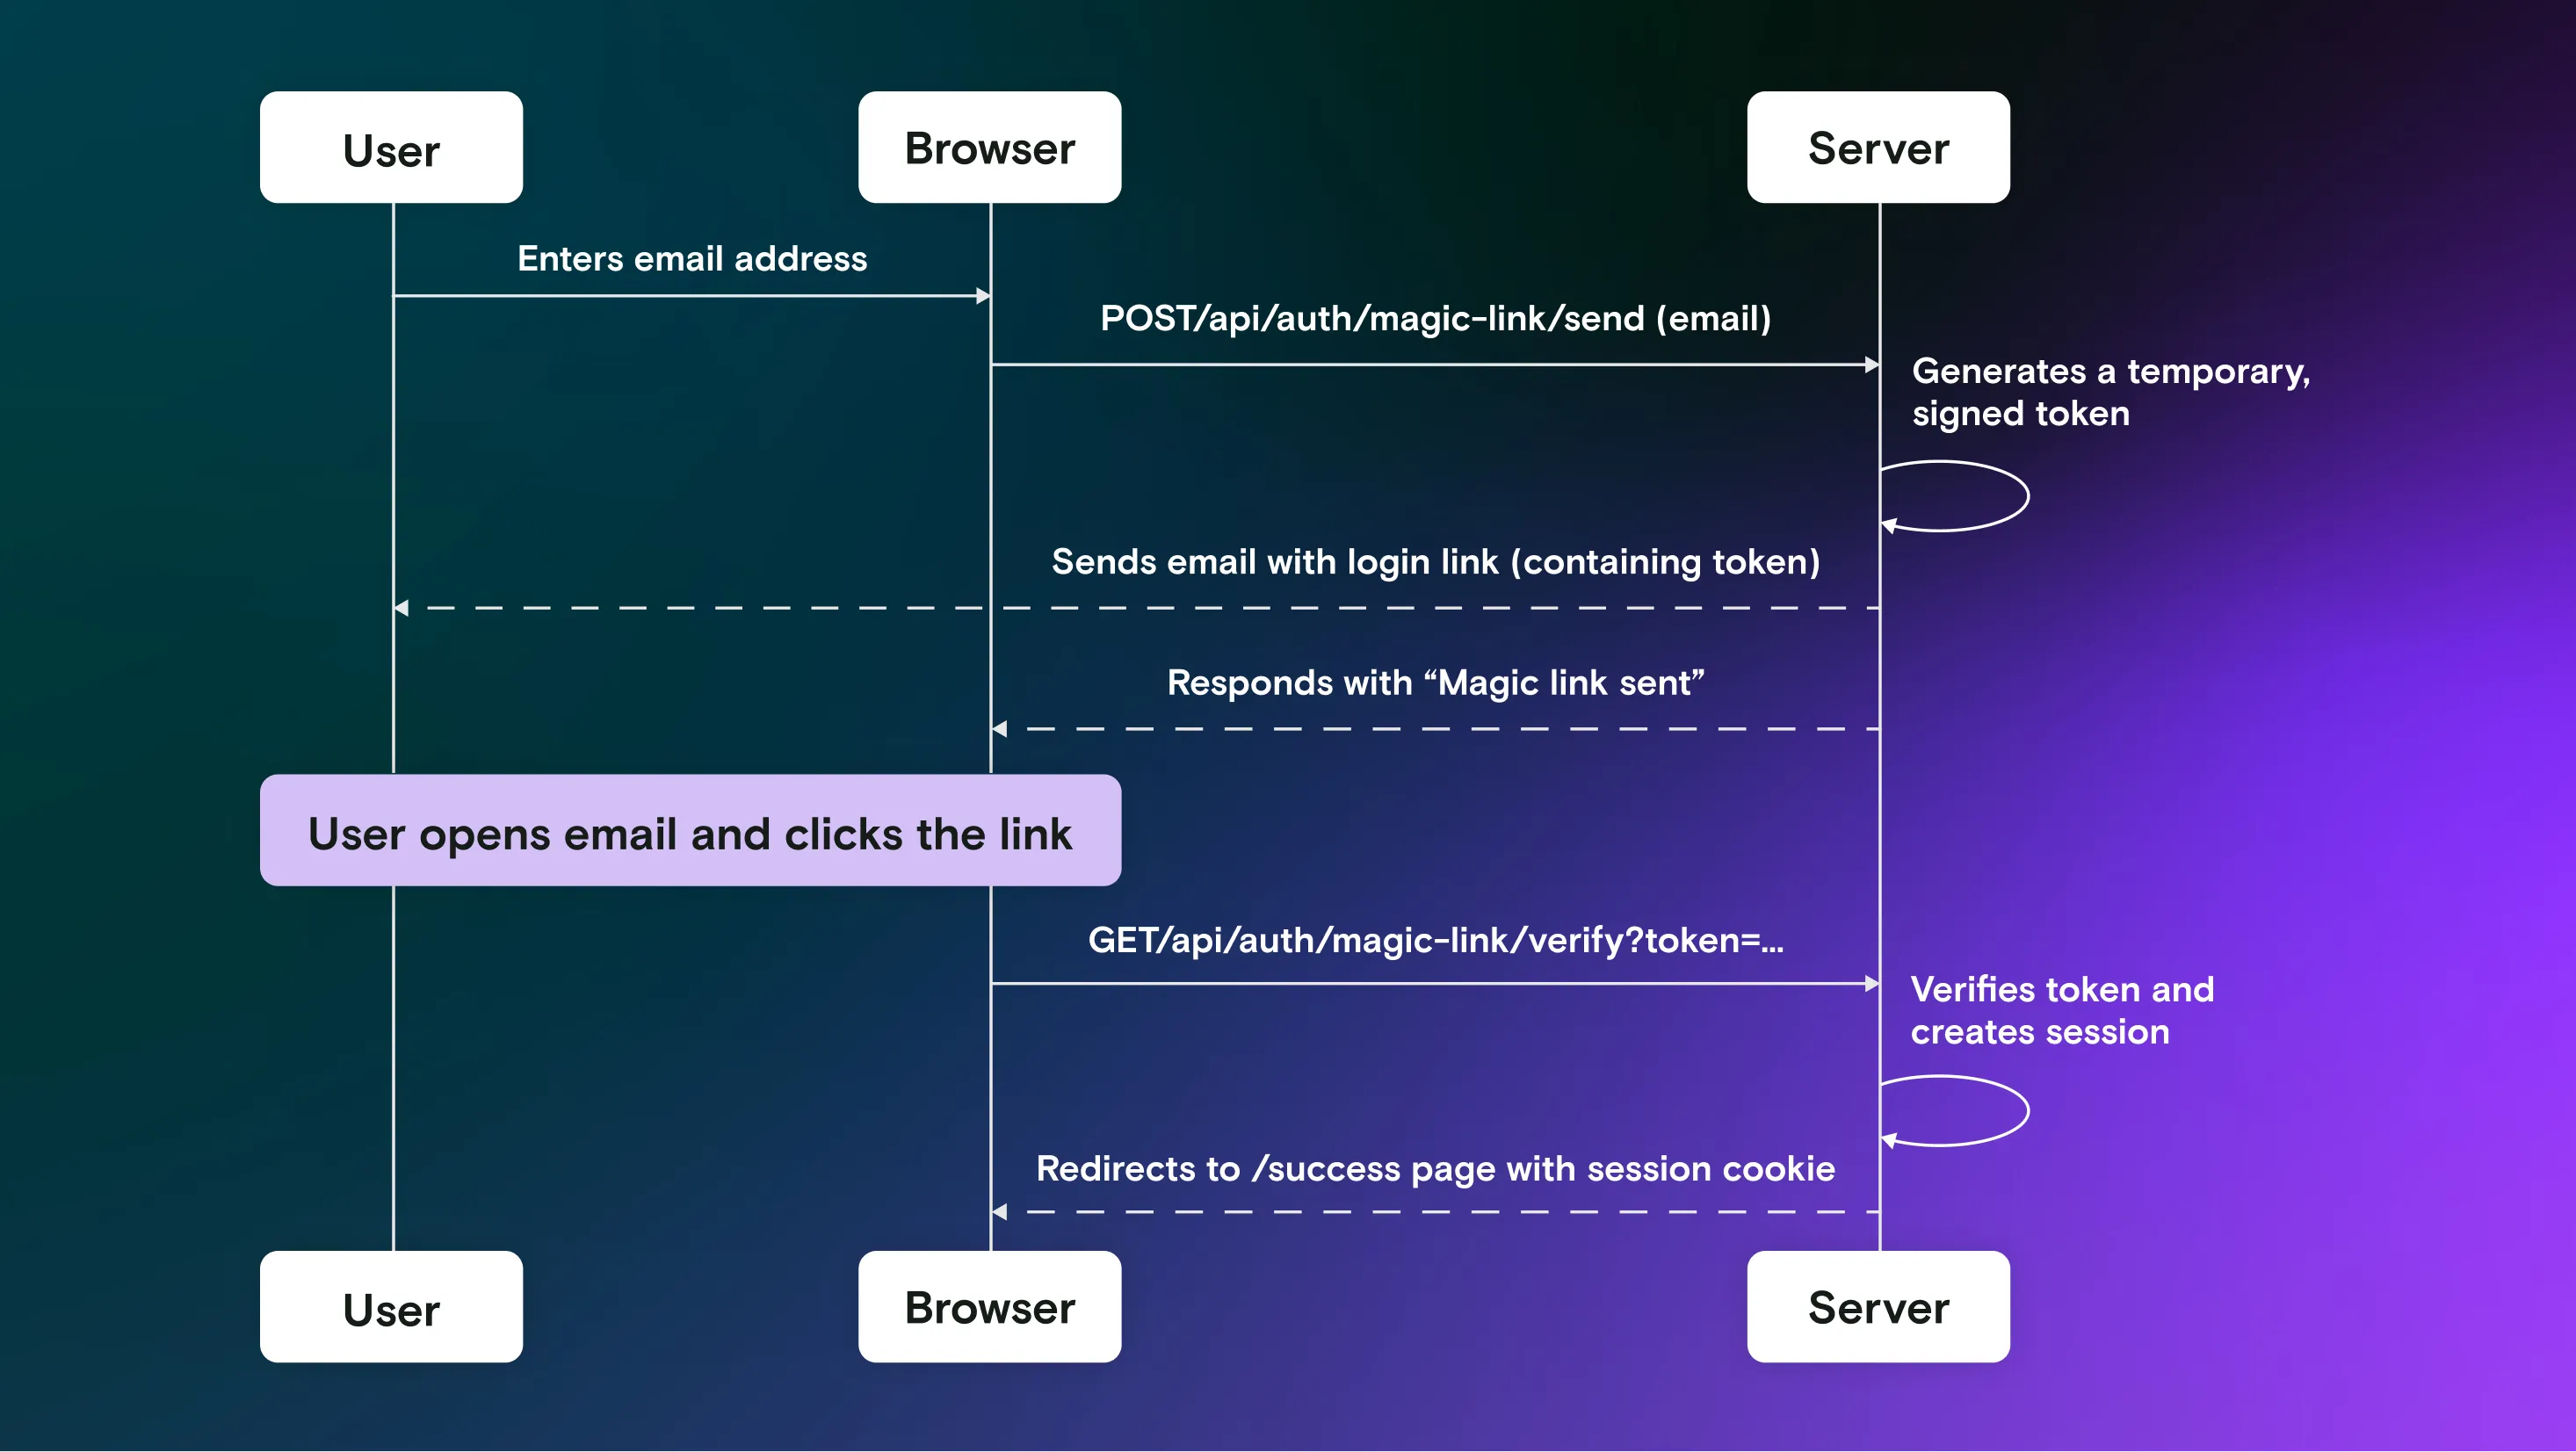
As you can see in the diagram above, the main challenge is that at a certain point the flow disconnects from the browser. When doing browser test automation, this is a problem. How do you enter your inbox?
This is where Mailosaur comes in. It allows you to programmatically access the inbox that Mailosaur created for you. You’ll retrieve the vital information from the inbox (email containing the link) and then continue on with the test.
Here's how a test like this would look like in Playwright:
import { test, expect } from '@playwright/test';
import { default as MailosaurClient } from 'mailosaur';

test('should send a magic link to the email address', async ({ page }) => {
  const mailosaur = new MailosaurClient(process.env.MAILOSAUR_API_KEY as string);
  const serverId = process.env.MAILOSAUR_SERVER_ID as string;
  const testEmail = `testing-email@${serverId}.mailosaur.io`;

  await page.goto('/auth/magic-link');

  await page.getByRole('textbox', { name: 'email' }).fill(testEmail);
  await page.getByText('Send Magic Link').click();

  const message = await mailosaur.messages.get(serverId, {
    sentTo: testEmail
  });

  const link = message.html?.links?.[0]?.href;

  await page.goto(link as string);

  await expect(page.getByText('Authentication Successful!')).toBeVisible();
});
Note: In order to use
.envvariables in Playwright, you need to import thedotenvpackage to theplaywright.config.tsfile:import 'dotenv/config'; dotenv.config(); /// rest of the config file...
The key part here is the mailosaur.messages.get() method. It automatically waits for the email to arrive, and parses the email content. You can access them via message.html.links. Each link object contains:
{
  href: 'https://example.com/verify?token=abc123',
  text: 'Verify your account'
}
If your email contains multiple links, you can filter them:
const verifyLink = message.html.links.find(
  link => link.href.includes('/verify')
);
Method 2: SMS verification codes
In essence, SMS-based authentication is the same as email magic links, but instead of an email, it sends a numeric code to your phone. You enter this code to prove you own that phone number. Here's the flow:
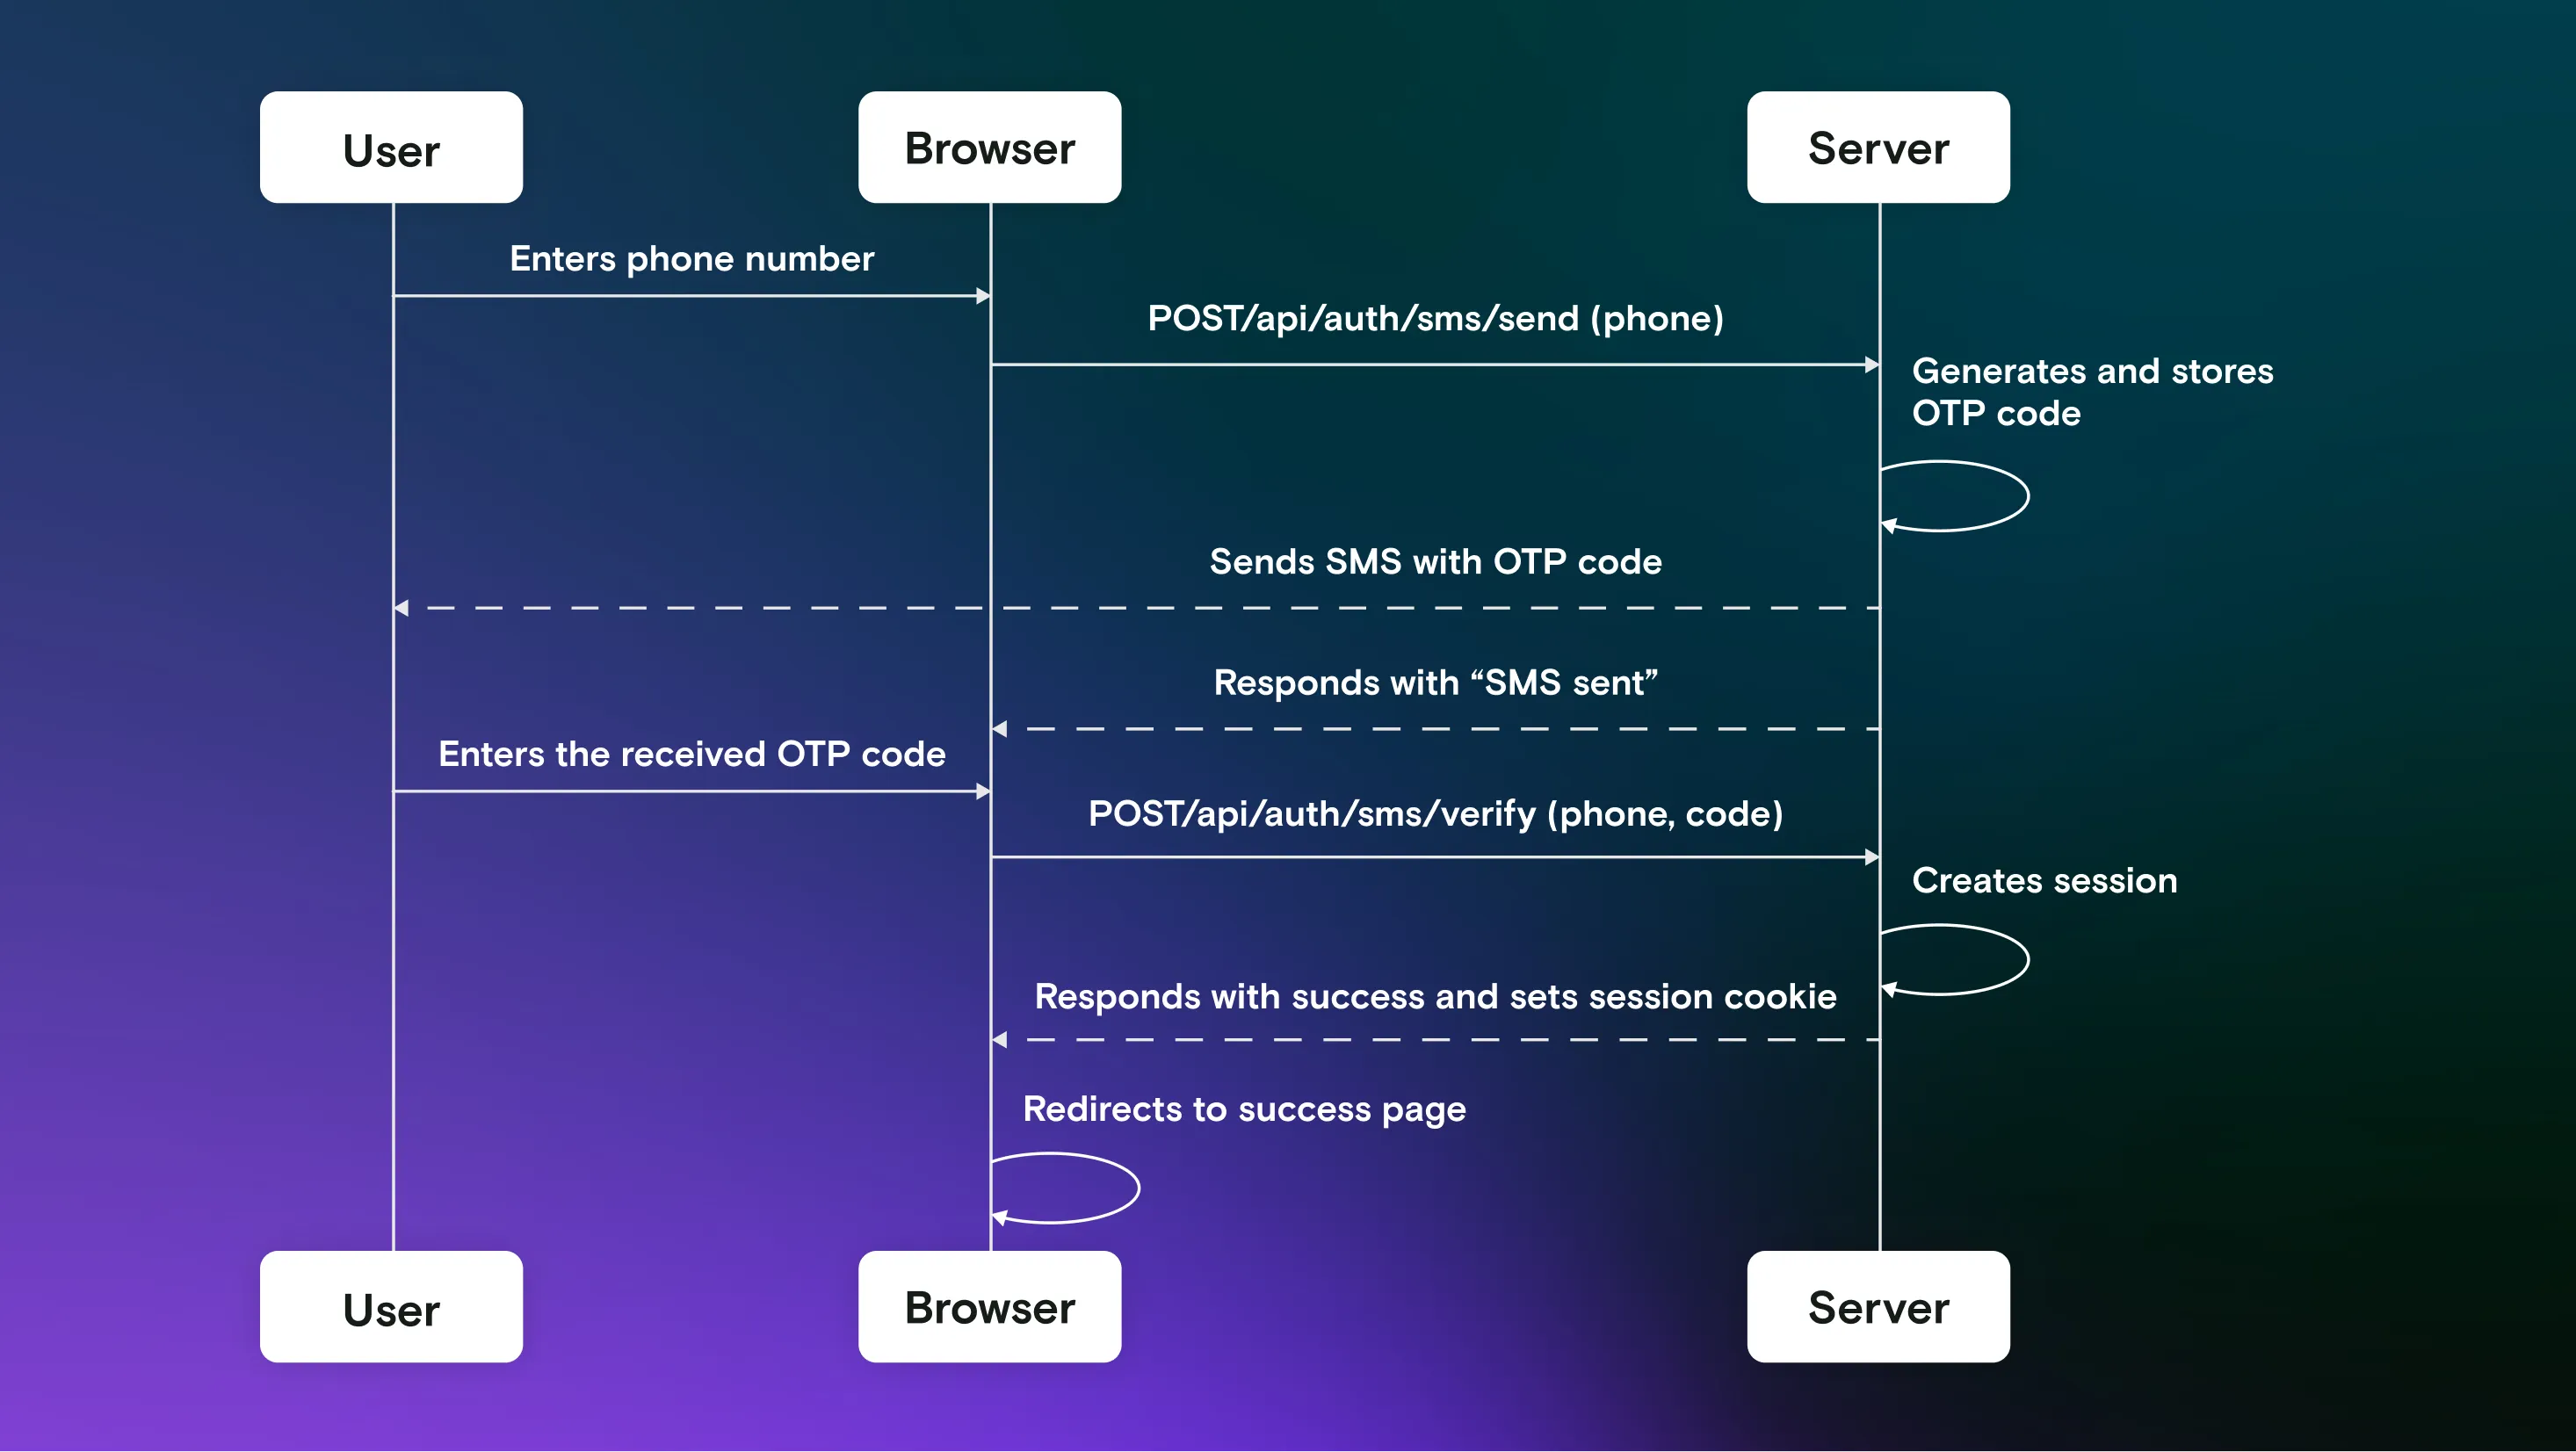
With Mailosaur, you can create a virtual phone number that will receive your SMS messages to.
Once you have one, you can start using it in your tests. Here's how to automate this flow:
import { test, expect } from '@playwright/test';
import { default as MailosaurClient } from 'mailosaur';

test('should send SMS code and verify authentication', async ({ page }) => {
  const mailosaur = new MailosaurClient(process.env.MAILOSAUR_API_KEY as string);
  const serverId = process.env.MAILOSAUR_SERVER_ID as string;
  const testPhone = '+12345678910'; // your Mailosaur phone number

  await page.goto('/auth/sms');

  await page.getByRole('textbox', { name: 'phone' }).fill(testPhone);
  await page.getByText('Send SMS Code').click();

  await expect(page.getByText('SMS sent! Enter the verification code.')).toBeVisible();

  const message = await mailosaur.messages.get(serverId, {
    sentTo: testPhone
  });

  // extract 6 digit code from SMS
  const otpMatch = message.text?.body?.match(/\b(\d{6})\b/);
  expect(otpMatch).toBeTruthy();
  const otpCode = otpMatch![1];

  await page.getByRole('textbox', { name: 'otp' }).fill(otpCode);
  await page.getByText('Verify Code').click();

  await expect(page.getByText('Authentication Successful!')).toBeVisible();
});
Just like with email links, Mailosaur automatically extracts verification codes from SMS messages. You can access them via message.text.codes. If your SMS contains multiple codes (though this is rare), they'll all be available in the codes array.
const code = message.text.codes[0].value; // e.g., "564214"Method 3: Authenticator apps (TOTP)
Authenticator apps like Google Authenticator or Authy generate time-based one-time passwords (TOTP). These codes change every 30 seconds and are generated using a shared secret. There are actually two steps in this flow.
In the first step, you setup the authenticator app with the shared secret.
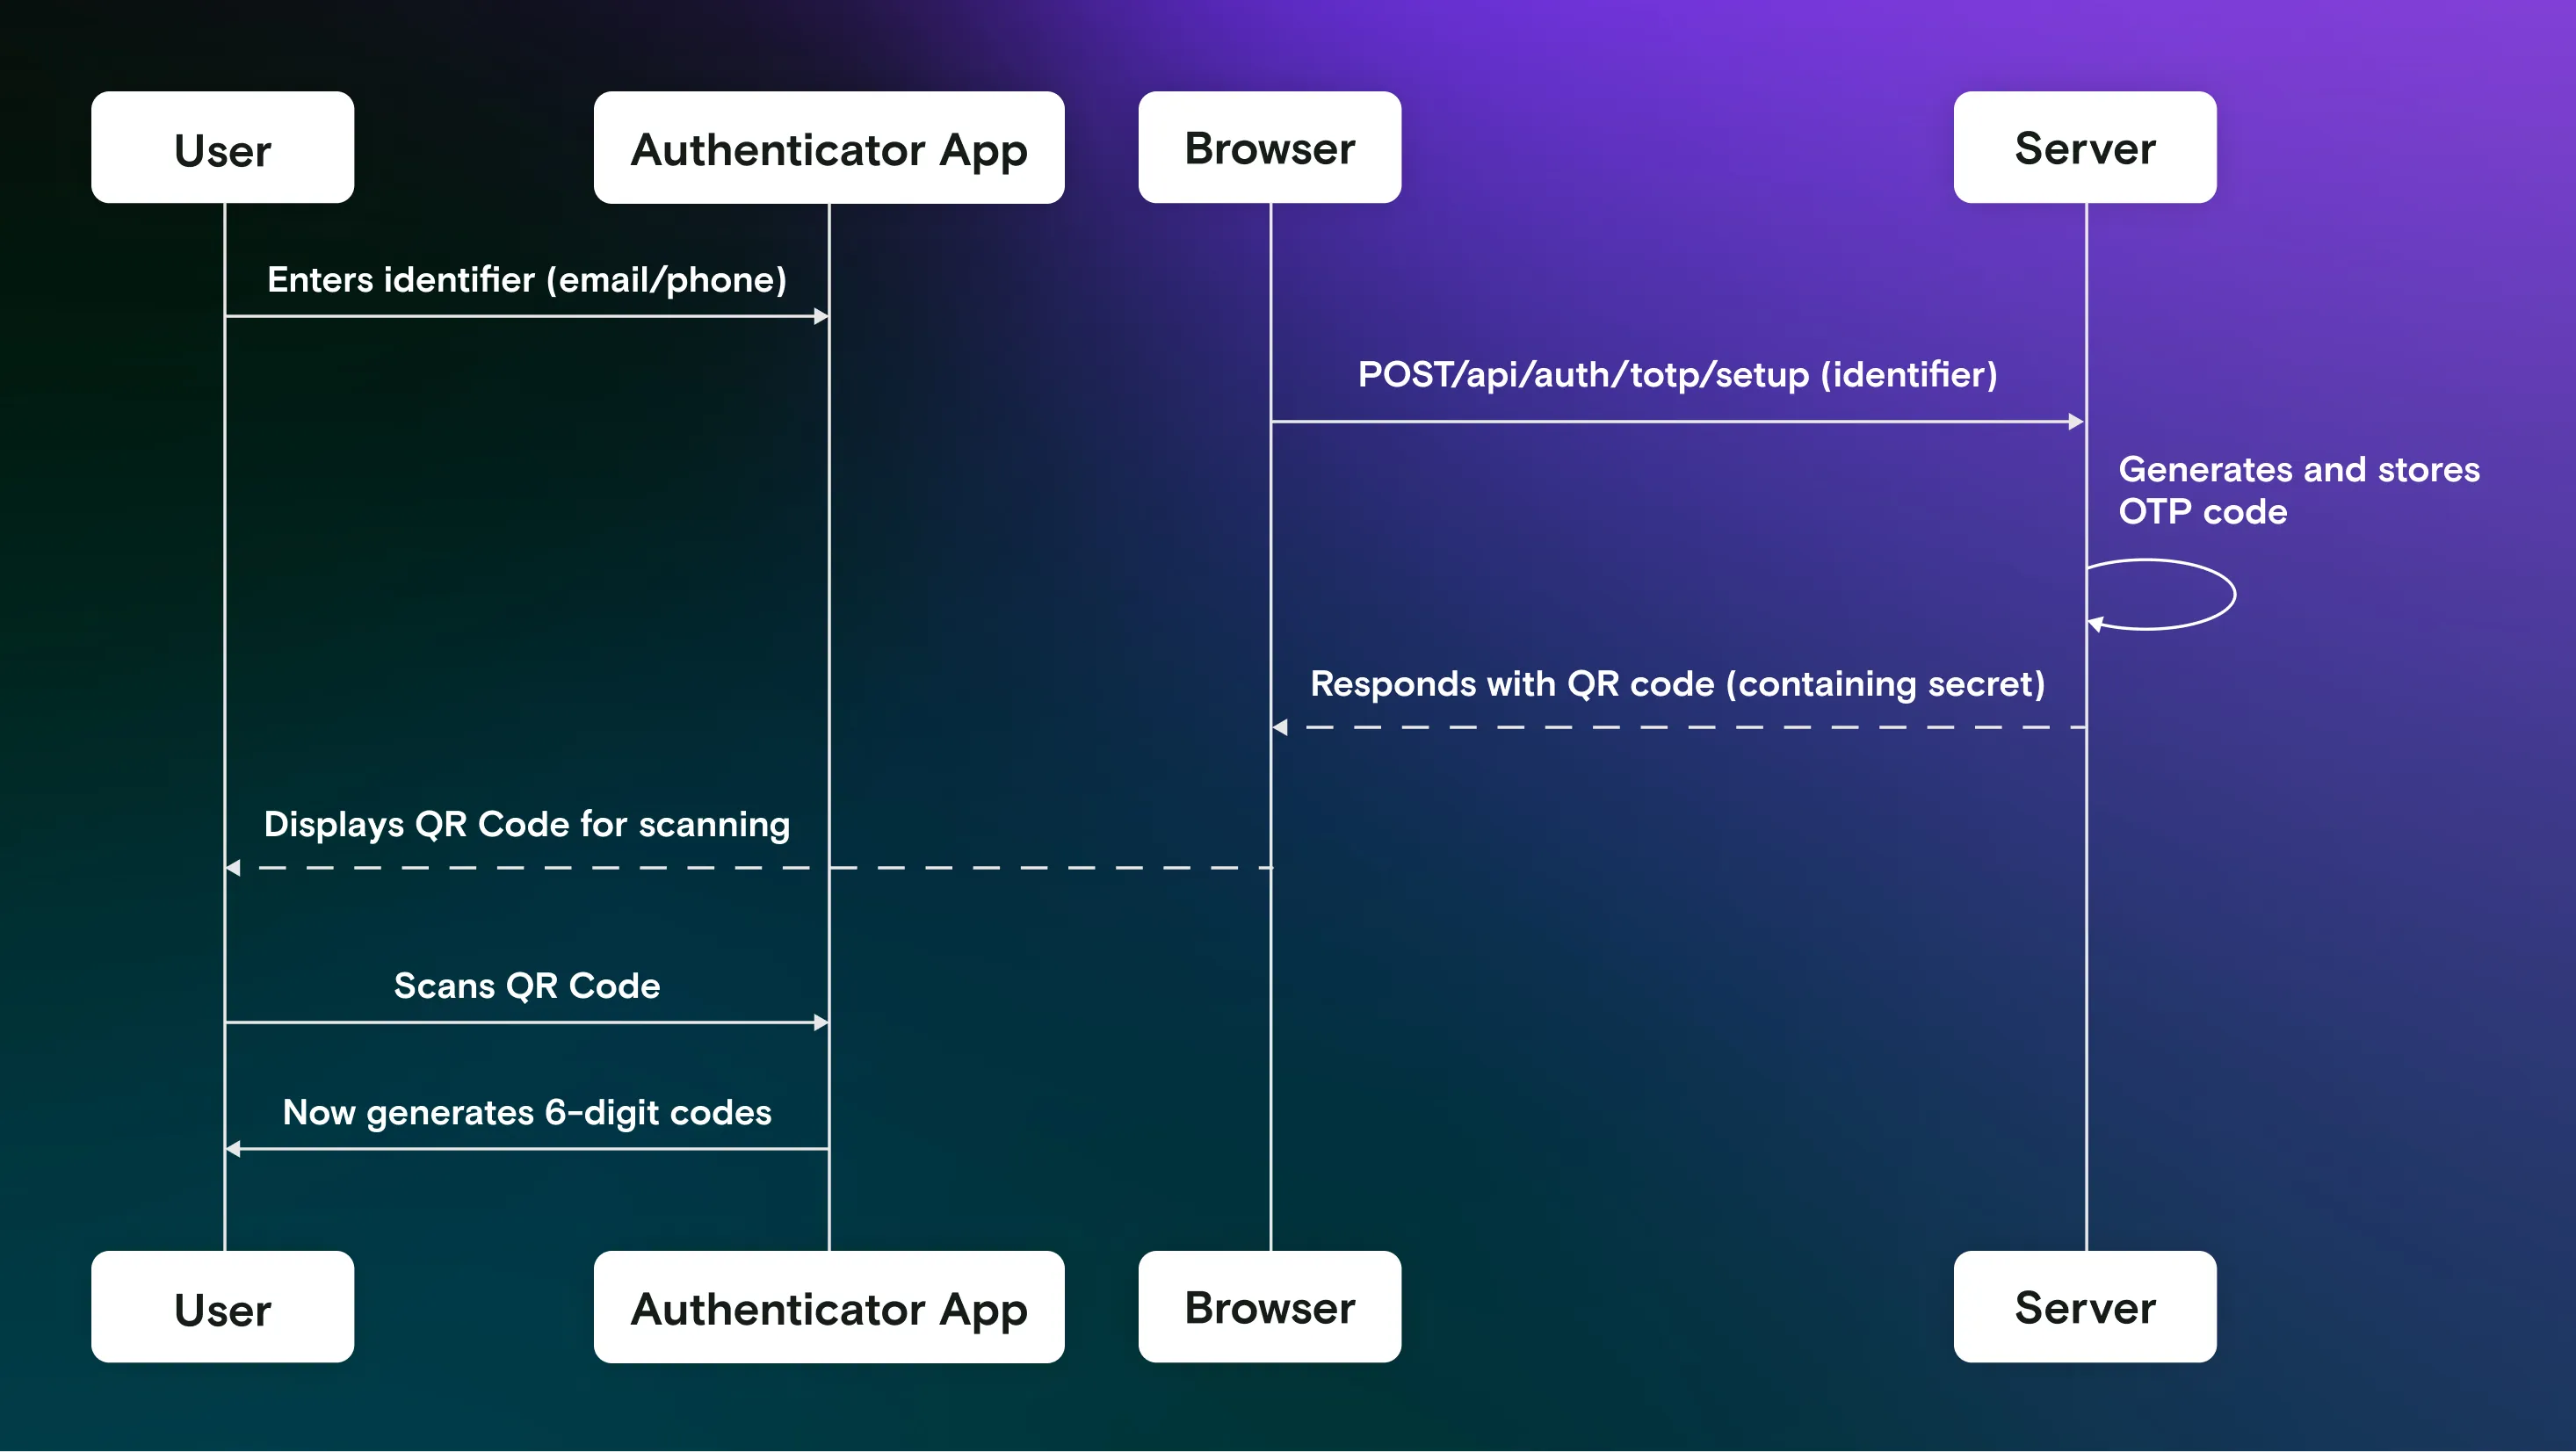
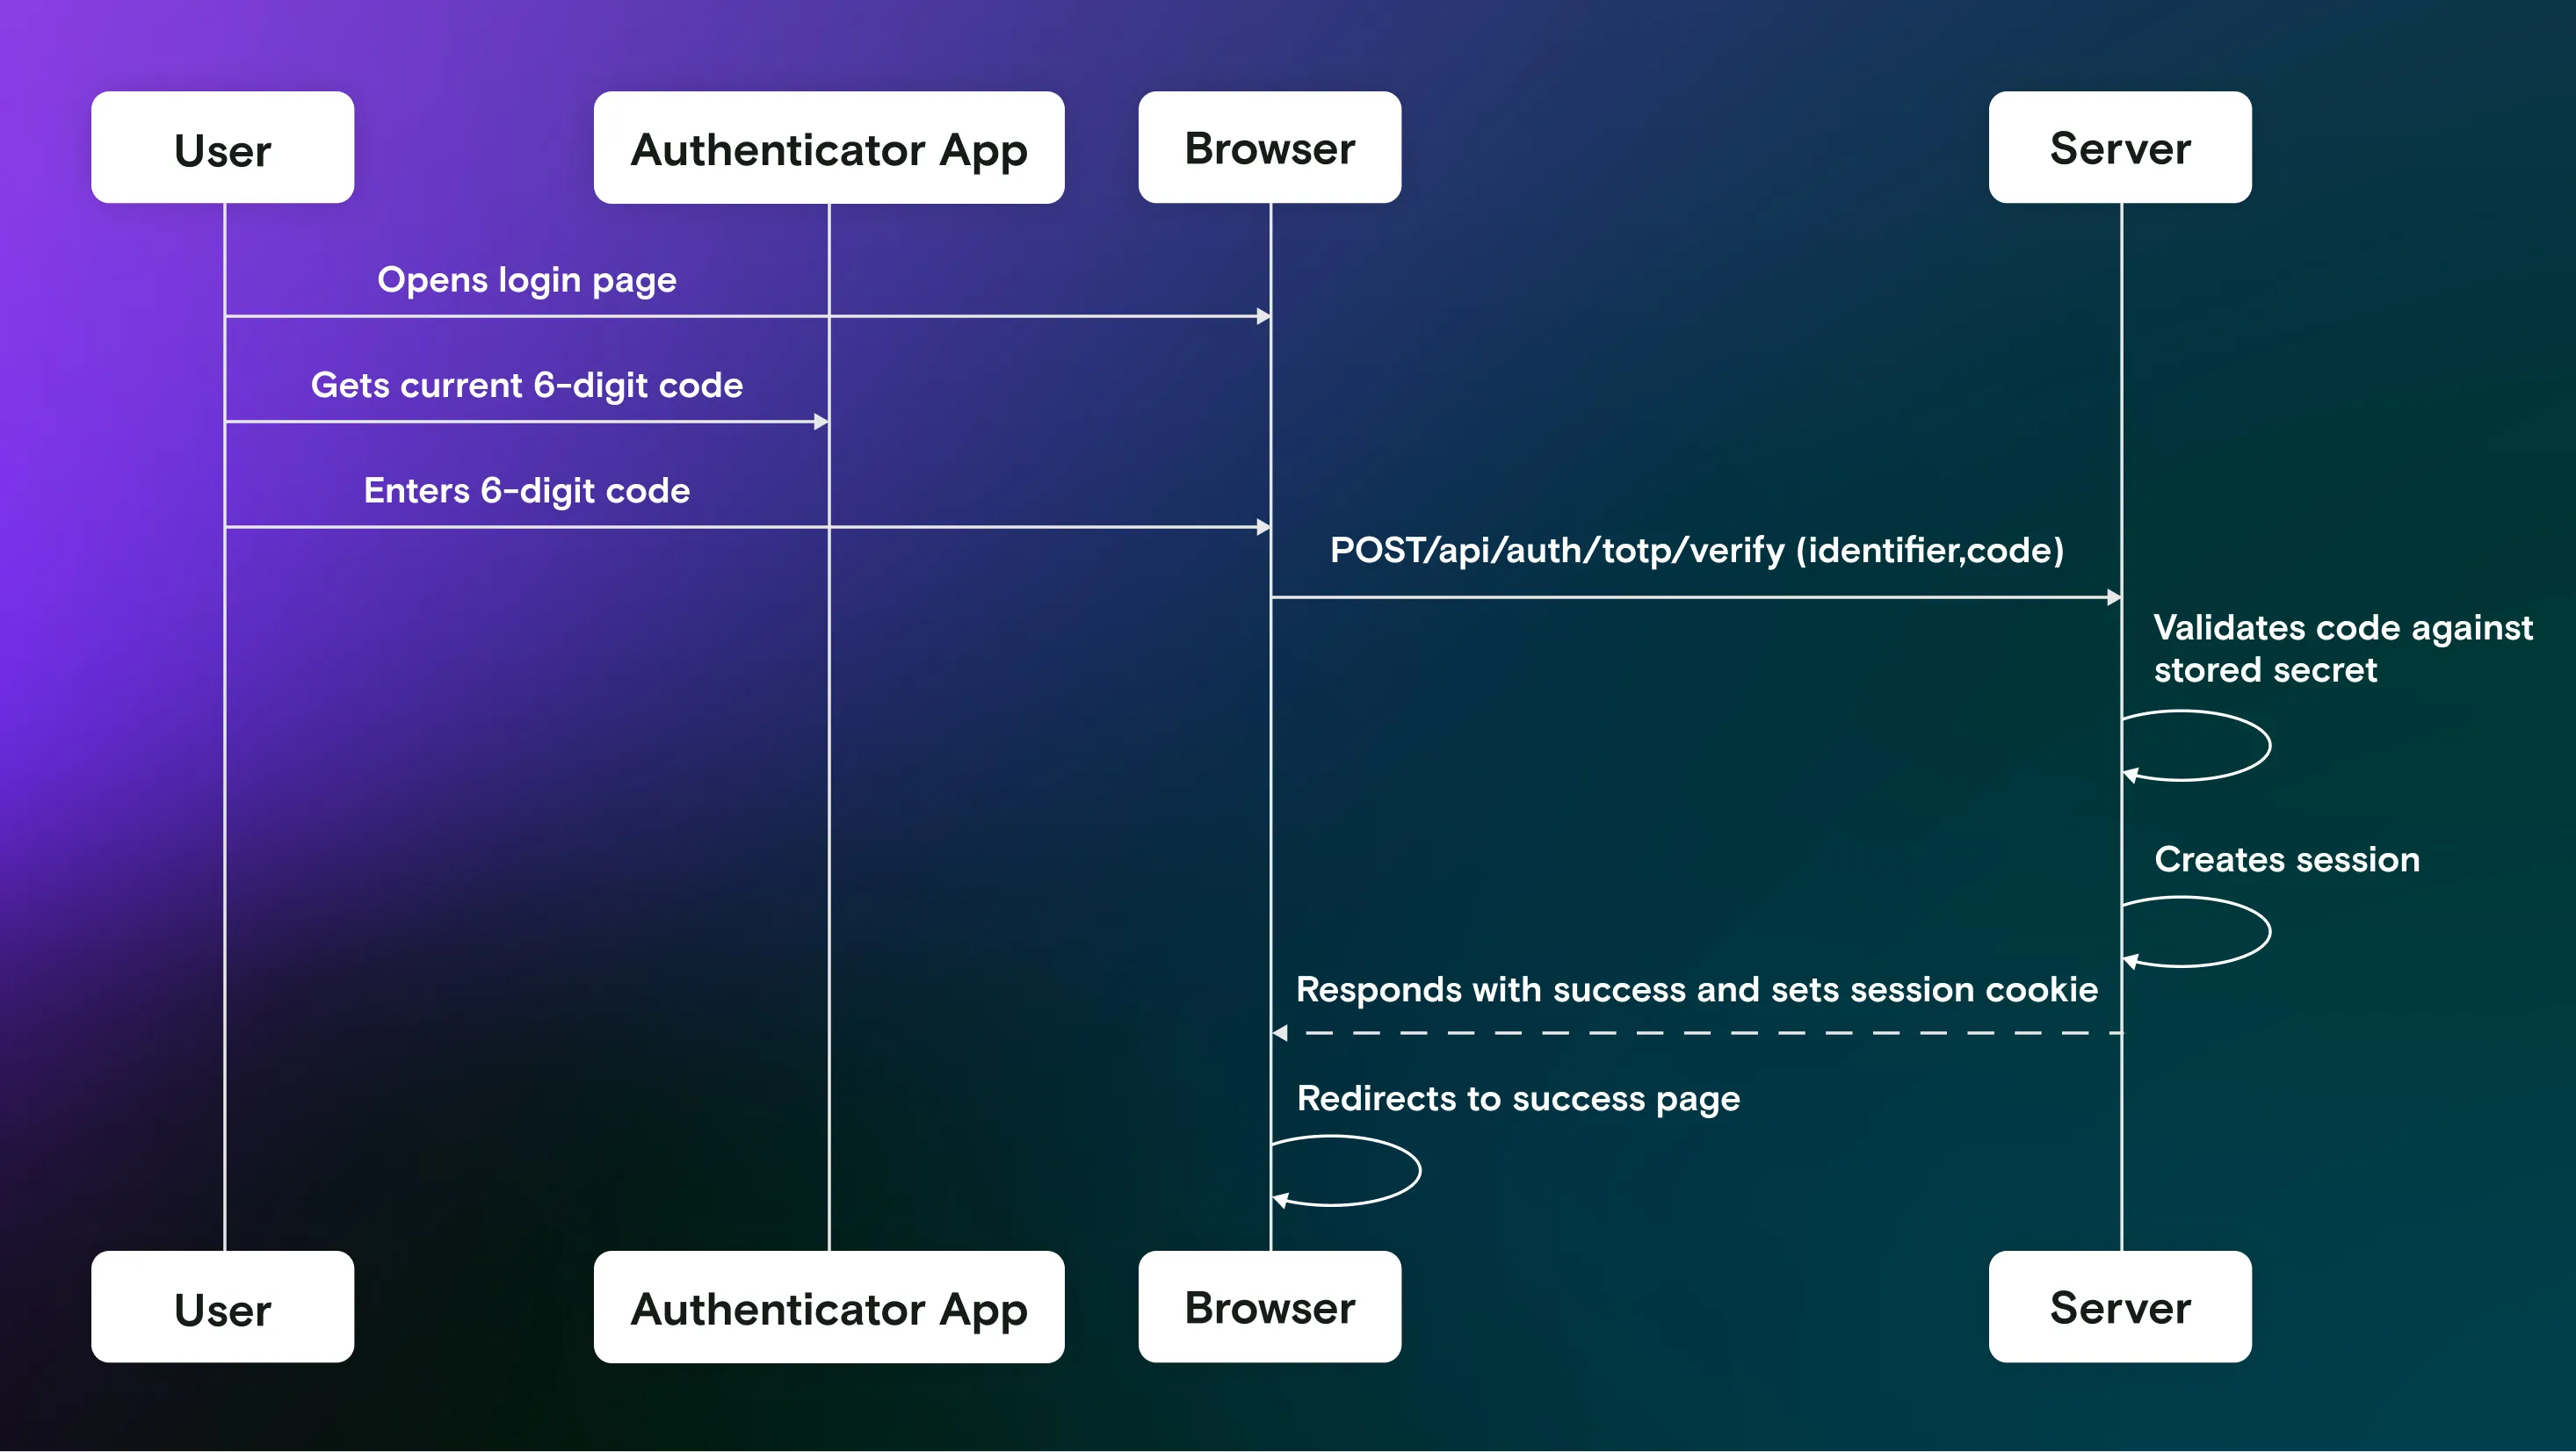
In the second step, you use the authenticator app to generate a code and enter it into the login form. This code will then be validated on the server.
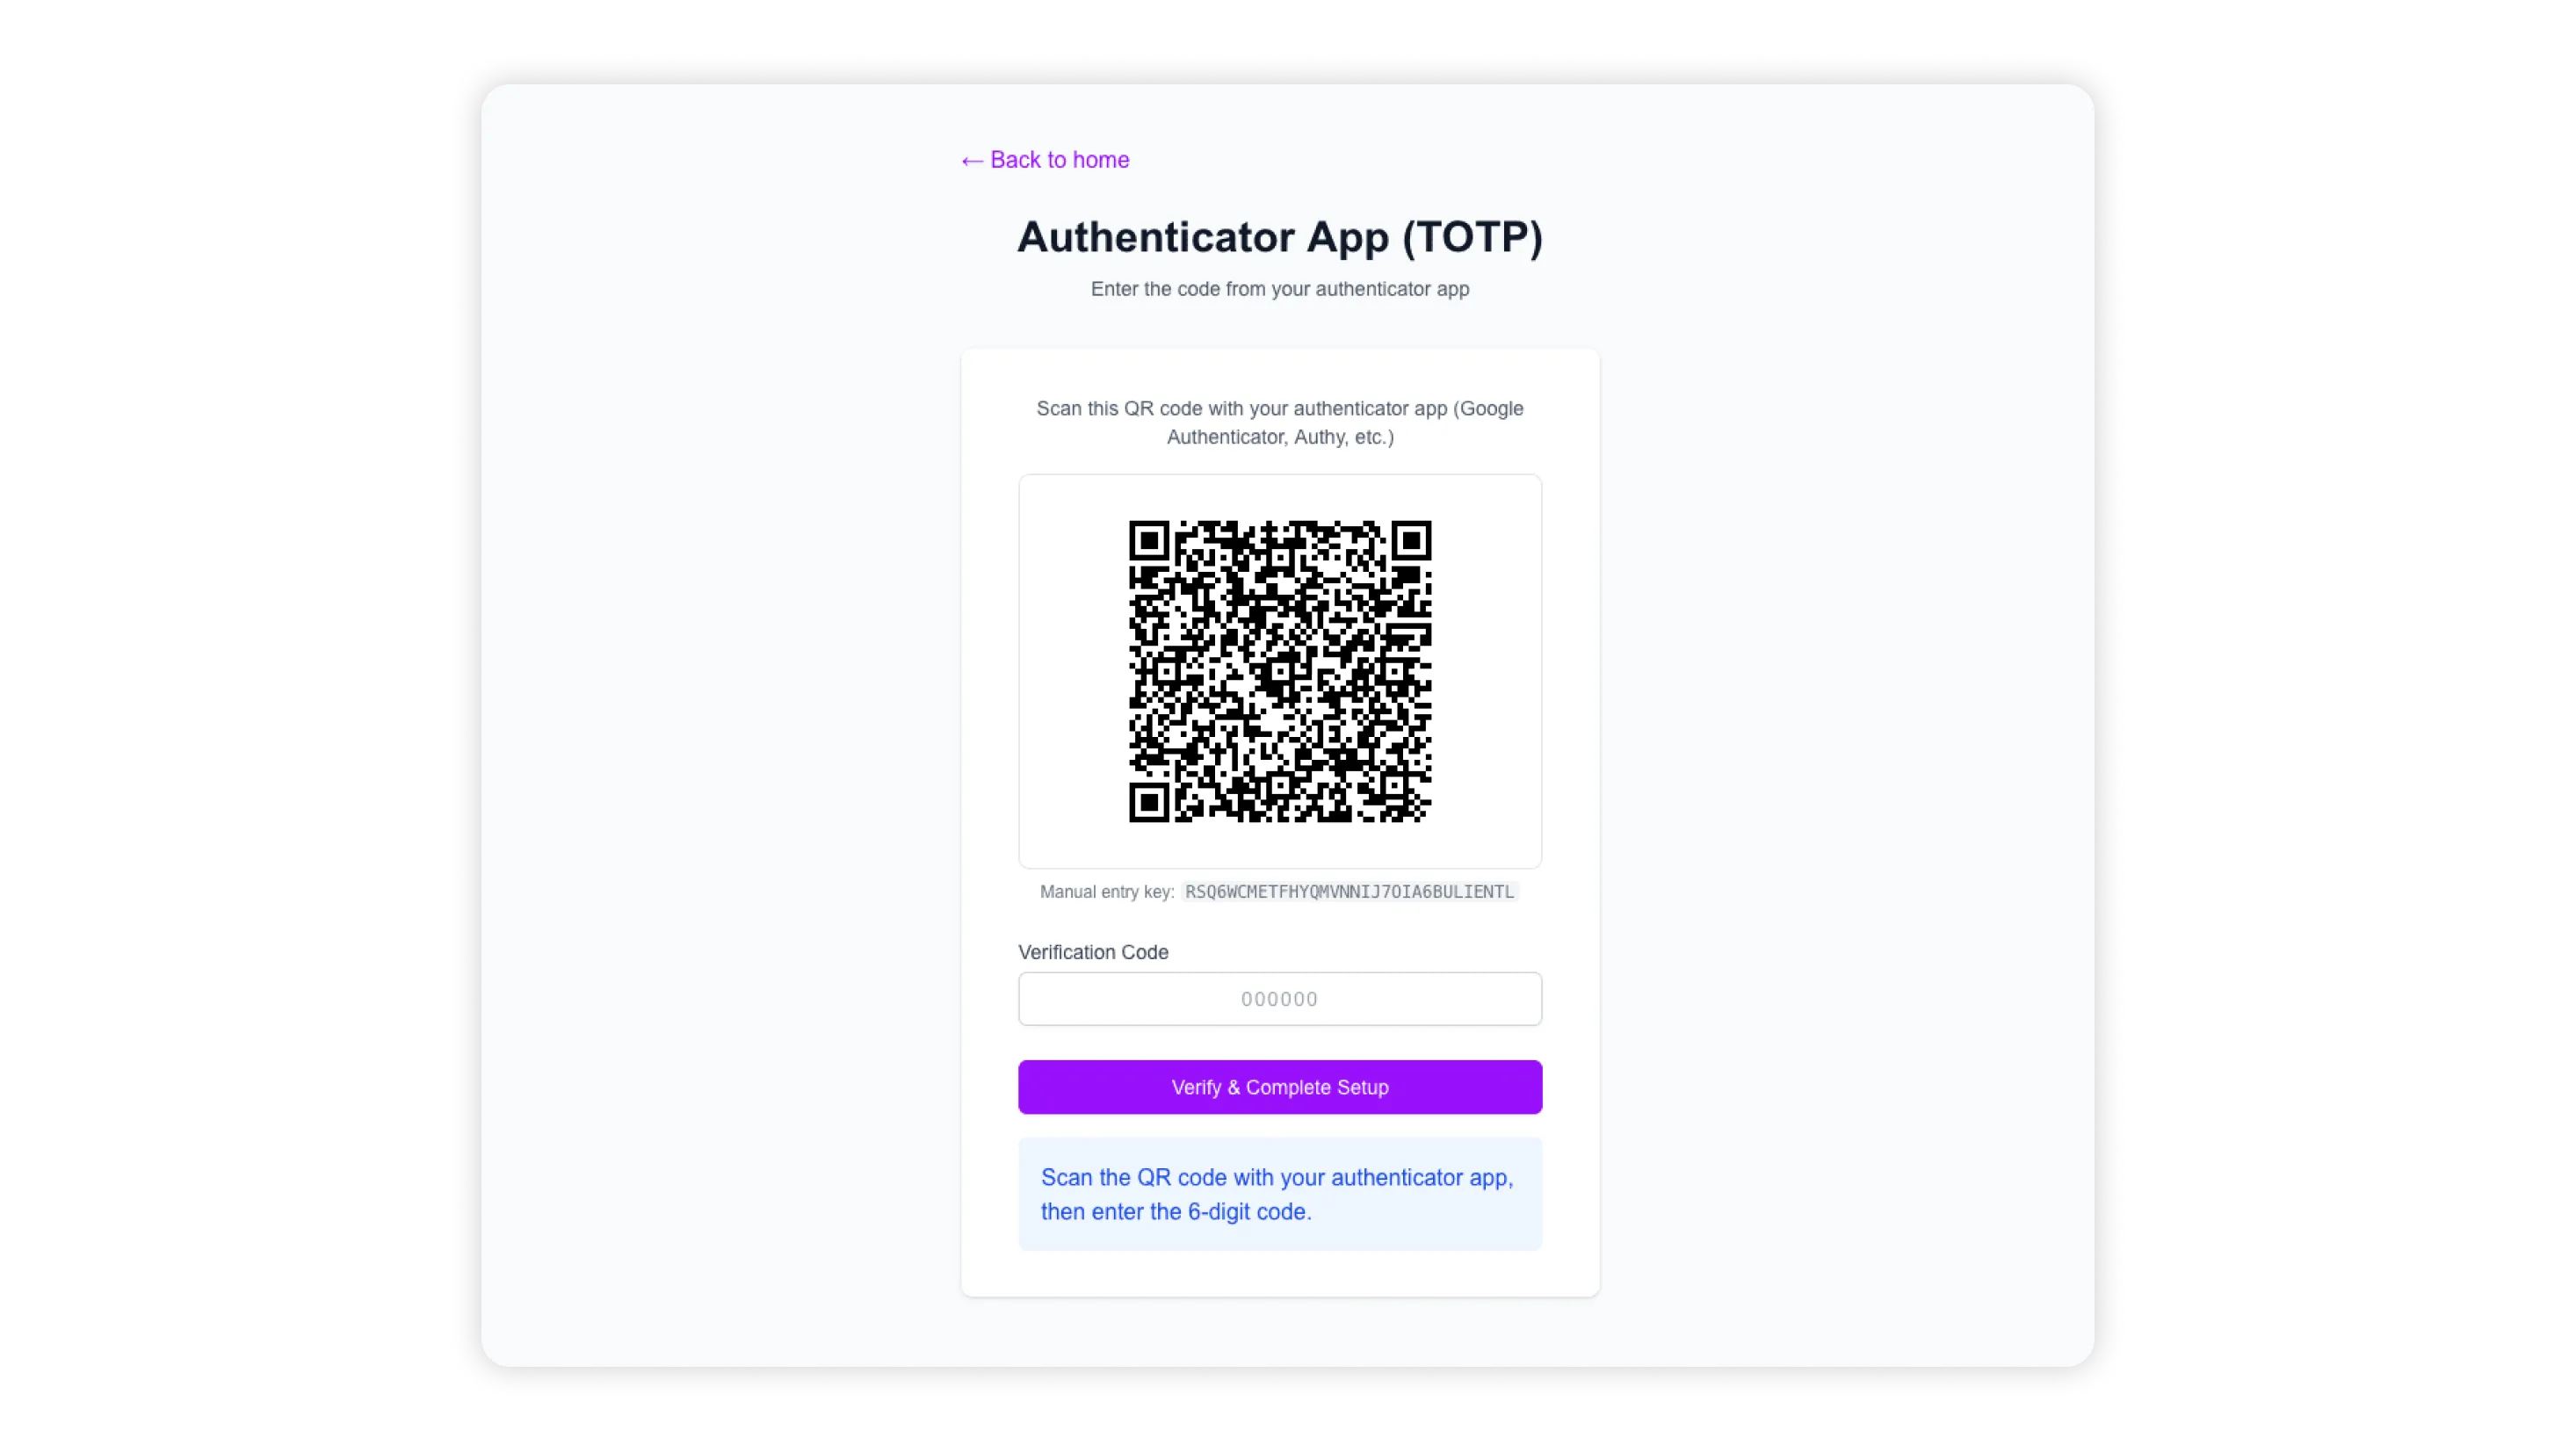
The secret is usually presented as a QR code or a string of characters during setup. When integrating with Mailosaur, you can manually set up the first step inside Mailosaur’s service:
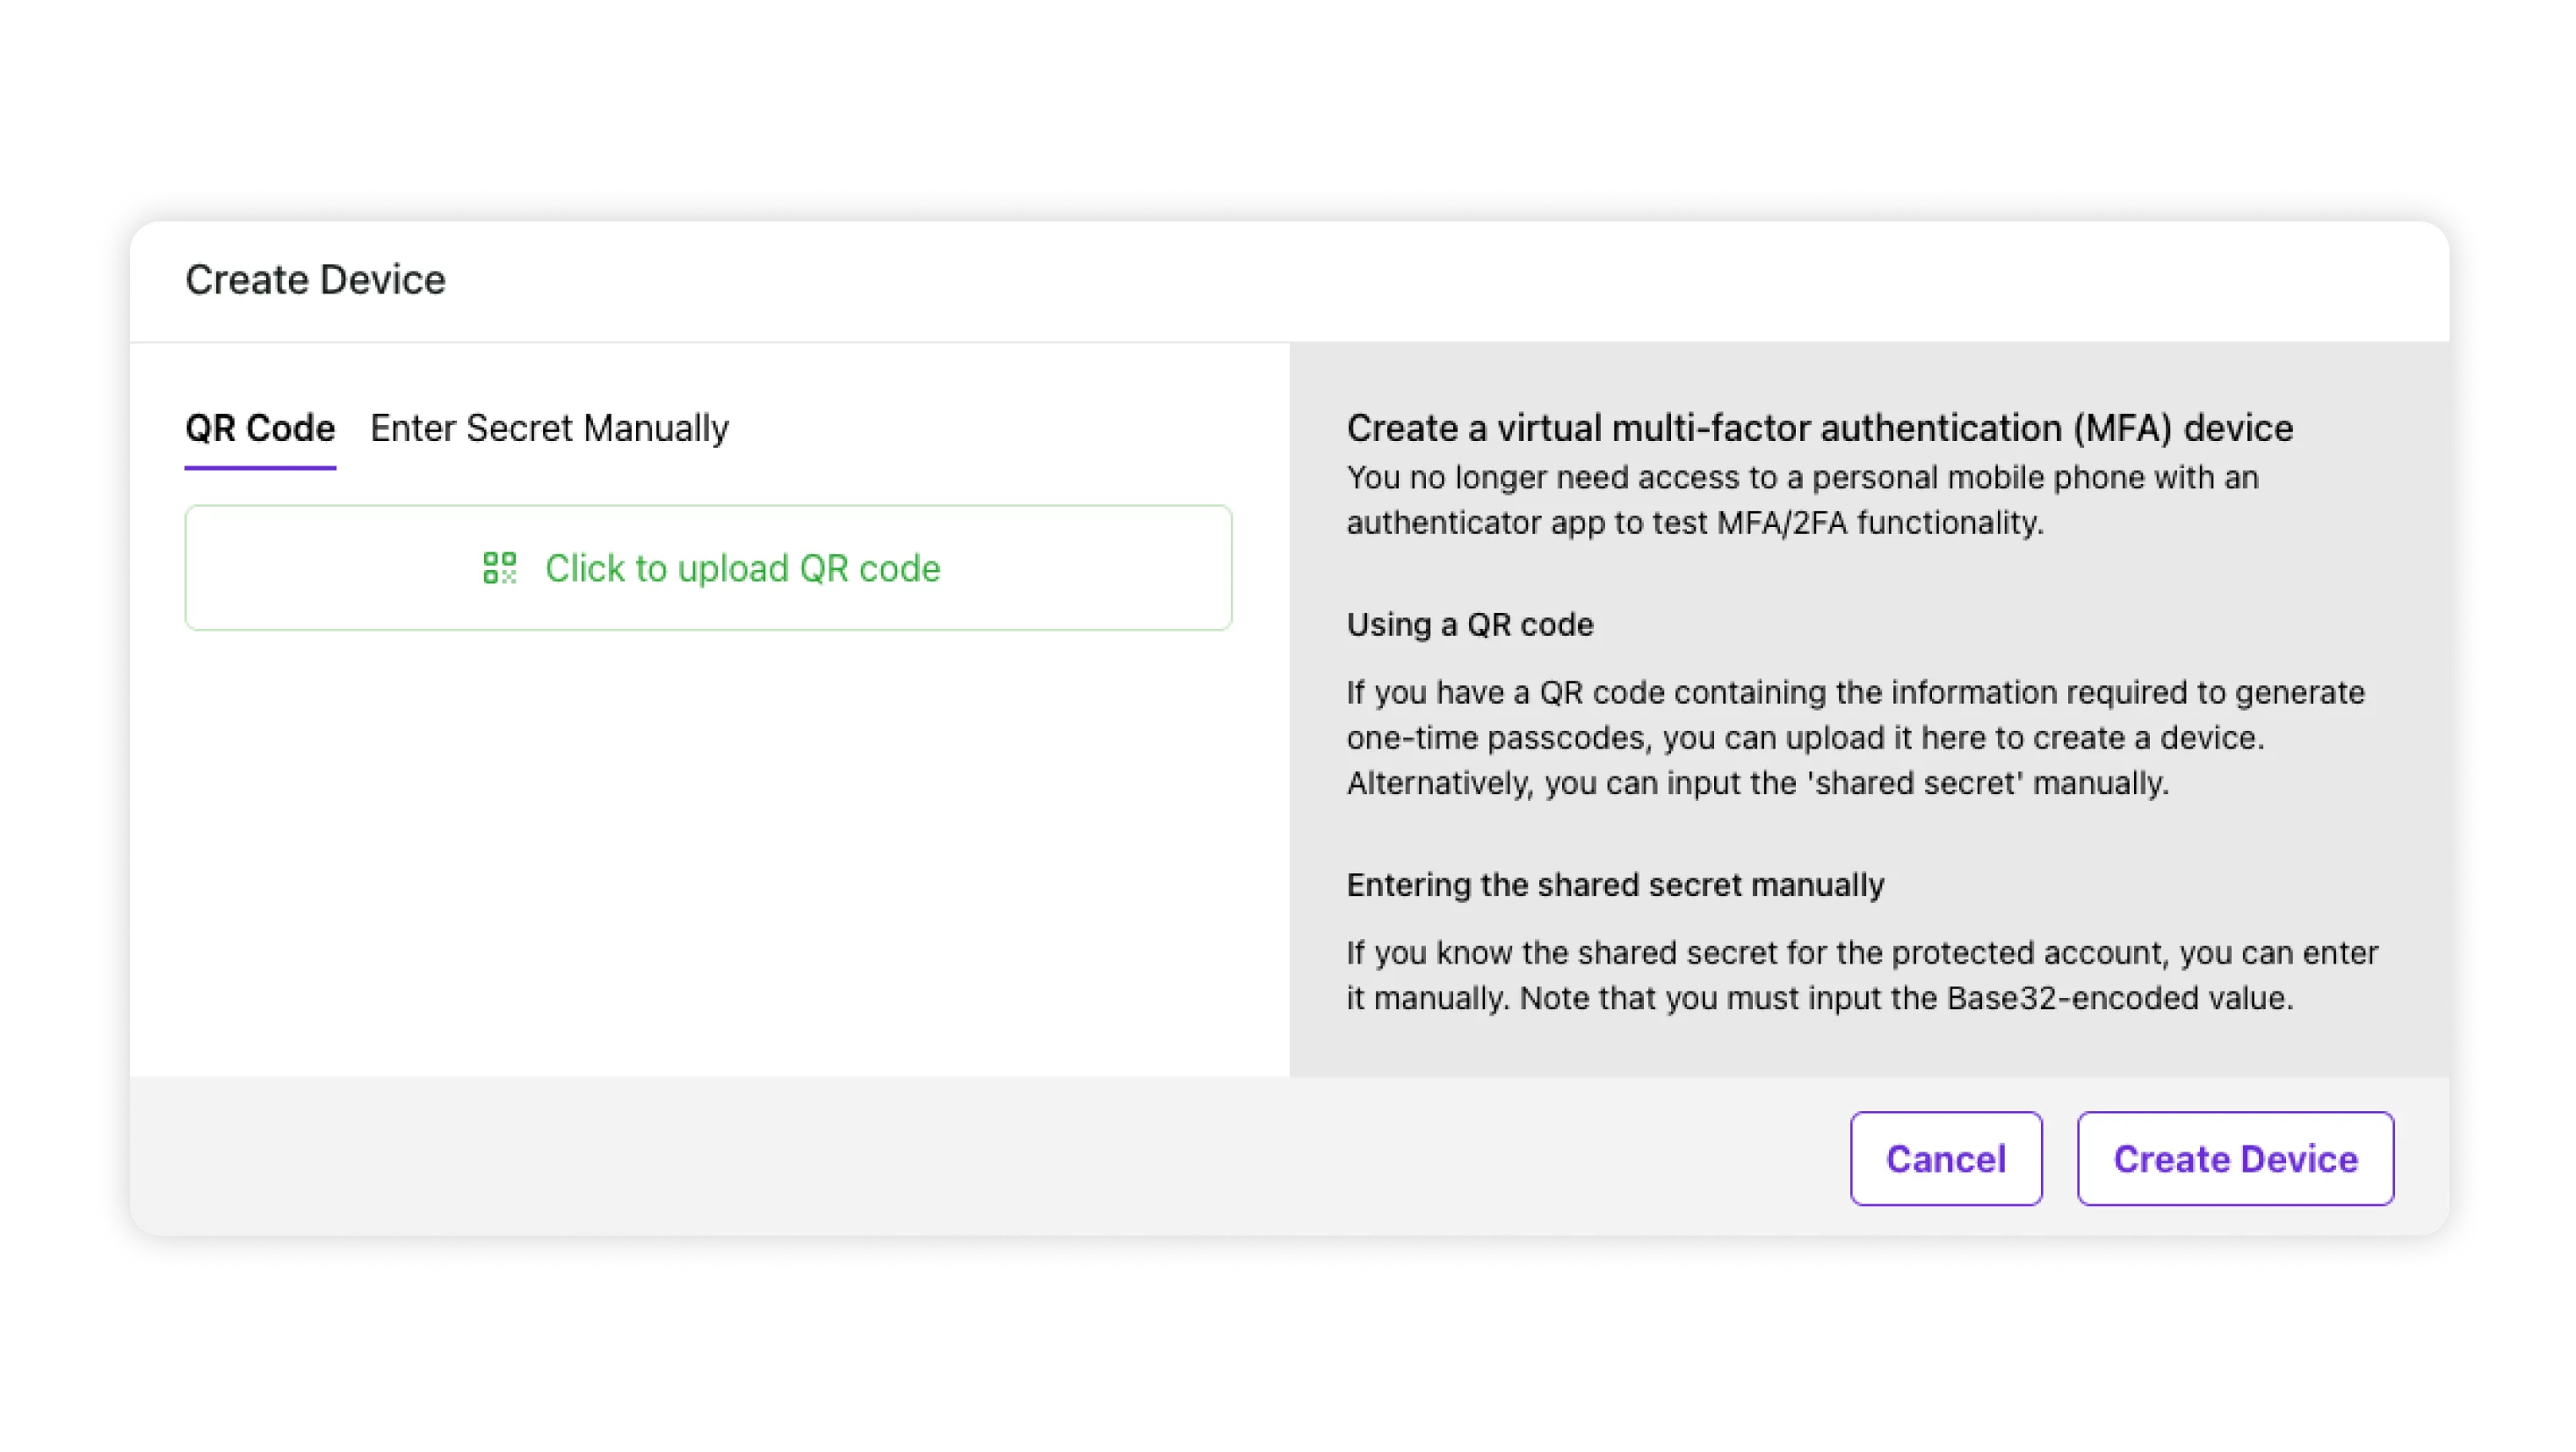
This allows you to interact with the authenticator during a manual test. But you can also set up things automatically in your tests. Here's how the test for a TOTP authentication flow would look like:
import { test, expect } from '@playwright/test';
import { default as MailosaurClient } from 'mailosaur';

test('login with authenticator app', async ({ page }) => {
  const mailosaur = new MailosaurClient(process.env.MAILOSAUR_API_KEY as string);
  const serverId = process.env.MAILOSAUR_SERVER_ID;
  const testEmail = `testing-totp@${serverId}.mailosaur.net`;

  await page.goto('/auth/totp');

  await page.getByRole('textbox', { name: 'Email or Phone' }).fill(testEmail);
  await page.getByText('Setup TOTP').click();

  const secretElement = page.locator('code');
  const sharedSecret = await secretElement.textContent() as string;

  const otp = await mailosaur.devices.otp(sharedSecret);

  await page.locator('#totpCode').fill(otp.code as string);
  await page.getByRole('button', { name: 'Verify & Complete Setup' }).click();

  await expect(page.getByText('Authentication Successful!')).toBeVisible();
});
As you can notice, we are extracting the shared secret from an element on the page. You‘ll usually find this option on TOTP setup pages. But if you don't, you can always use QR code decoding to get the key.
Common gotchas and tips
Timing issues with TOTP codes
TOTP codes expire every 30 seconds. If your test is slow or runs near a boundary, the code might expire between generation and use. To handle this:
Email and SMS delivery delays
While Mailosaur's messages.get() method waits automatically, you can customize the timeout:
const message = await mailosaur.messages.get(
  serverId,
  { sentTo: testEmail },
  { timeout: 20000 } // 20 seconds instead of default 10 seconds
);
Cleaning up test data
If your inbox gets clogged with test data, you can clean it up:
test.afterEach(async () => {
  const mailosaur = new MailosaurClient(process.env.MAILOSAUR_API_KEY);
  await mailosaur.messages.deleteAll(process.env.MAILOSAUR_SERVER_ID);
});
Using search criteria to find specific emails
Instead of relying on unique email addresses, you can search for emails based on their content or subject. This is especially useful when multiple tests might send emails to the same address:
const message = await mailosaur.messages.get(serverId, {
  sentTo: testEmail,
  subject: 'Login',
  body: 'verification code'
});
For SMS, you typically have a limited number of virtual phone numbers, so use search criteria to find the right message:
const message = await mailosaur.messages.get(serverId, {
  sentTo: phoneNumber,
  body: 'Your verification code' // Search by message content
});
Just like that, you can be confident that your two-factor authentication flows work seamlessly for your customers, without compromising their confidence or trust.
No Mailosaur subscription yet? No problem. You can schedule your free demo with our friendly Sales team and see exactly how Mailosaur could transform your testing, or start your 14-day free trial.